About Dodge Durango
An SUV first presented in 1997 is still produced to this day. The most modern, 3rd generation is probably the most popular on the streets of Europe, and this guide covers it's conversion to EU lighting standards.
There are two ways to do the conversion – the differences will be listed at the end of the article so you can choose which way you want to proceed.
Note: As always, converting your vehicle is your sole responsibility and this guide is just a helpful resource. We assume no liability for any damage that may occur when converting or using a converted vehicle. If you don't feel confident enough, please consult a specialised workshop.
What will you need (in both approaches):
- The JScan app with a license
- A compatible OBD adapter
- For 2018+ vehicles: a Security Gateway bypass cable (a.k.a. 12+8 Autel cable) plugged into the OBD port and the security gateway (check the gateway location). The OBD adapter is plugged to the cable then.
- Female Kostal SLK 2,8 and Kostal MLK 1,22 connectors (for the second option)
Common Steps (both for Option 1 and Option 2)
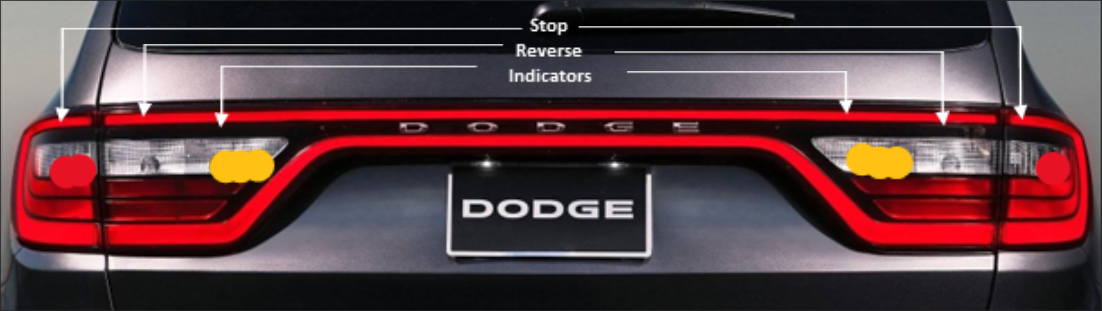
Rear Inidicators (Turn Signals)
First of all: Connect to your vehicle
Once connected:
- Open the ADAPTATIONS tab
- Open Lights conversion US <–> Euro
- Open Combined Rear Lights On/Off, choose Deactivated from the dropdown, press GO.
Stay within the app, we will still be doing a few more steps, but you can already see the result: the outer lights should now only work as stop lights.
- Open Left – Rear Turn Signal or Second Reverse Lamp – On/Off and set to Rear Turn Signal.
- Repeat for the right side.
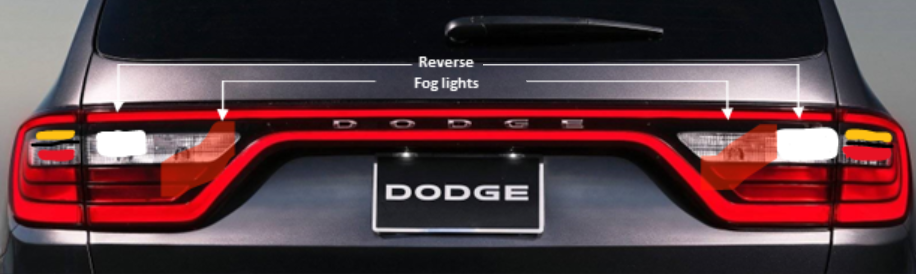
Now, instead of a double reverse light on the trunk door you should have the inner lights work as indicators and the outer (trunk) lights should stay as reverse.
Even though you have disabled the turn signals in the combined outer lamps, the vehicle will still measure the current in these lamps and will throw an error if you use the indicators at this point. To fix this:
- Open Rear Left Lamp Diagnostic – Door Ajar Switch Usage (Rear Driver) and set to Disabled
- Repeat for the right side.
If the error on the dash is still present:
- Open !Restart all ecus, select All modules – Power On Restart, press GO.
- Wait for the procedure to complete and follow the instructions given in the app.
Rear Fog Light
To activate the rear fog light we will use the same Adaptations > Lights conversion US <=> EURO section.
- Open Rear Fog Lamps Output Present – Connector E&F, PIN E39 & F5 and set it to Active
- Open Left – Rear Fog Lamp or High Beam Shutter On/Off and set to Left Rear Fog Lamp
- Open Right – Rear Fog Lamp or High Beam Shutter On/Off and set to Right Rear Fog Lamp
Important note! Both left and right rear fog light options have to be activated at the same time, even though we only have one rear fog light.
After the above the OEM fog lights switch will work in a cycle. Each press will trigger the next option:
- front fog lights on
- rear fog lights on
- rear fog lights off
- front fog lights off
However, you still need to do fix the wiring, and that's where the two different approaches are possible.
Option 1
The software has been reprogrammed: instead of 4 reverse lights on the trunk you now have 2 reverse lights and 2 indicators.
To replace the left reverse signal with the fog light signal you neet to swap one wire in the Body Control Module (BCM). The module is located on the right A pillar, in the passenger leg space.
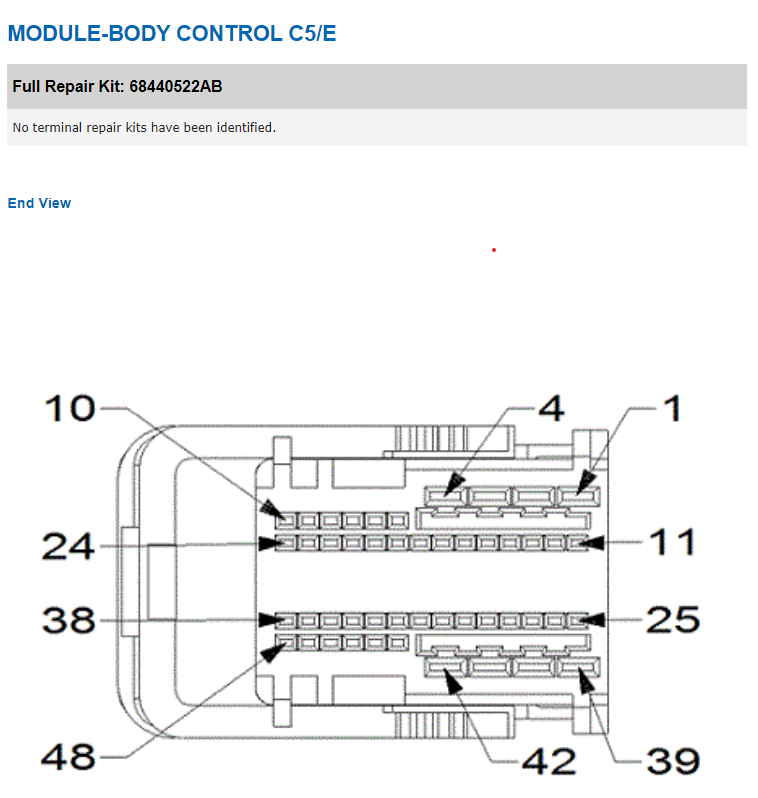
You will need to modify two, very characteristic connectors, marked as E and F on the BCM.
- Unplug the wire from the white C6/F connector, pin 41 (it goes to the rear left reverse light).
- Plug the wire into the black C5/E, pin 39
The result should now be as illustrated below
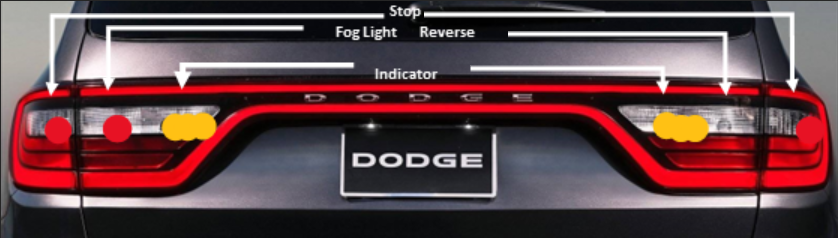
The last thing that needs to be done is changing the white light bulbs to colored ones.
It is also advisable to physically swap the places for reverse/fog and turn signal, so that the turn signals ore the outer lights on the trunk. The bulb sockets are the same, so you just undo both of them and attach each in the other socket, as illustrated below:
Option 2
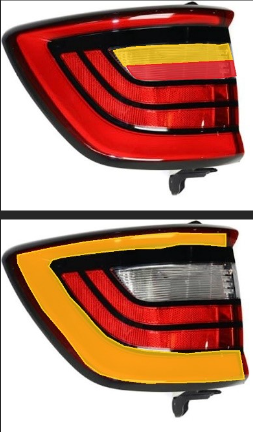
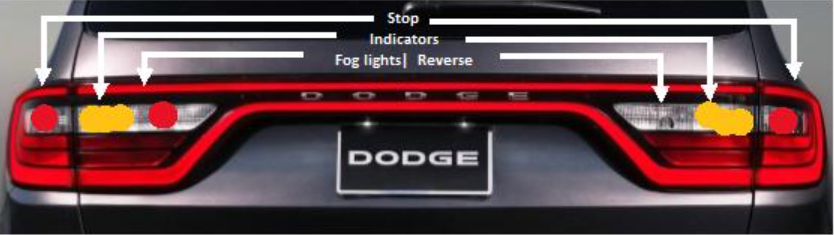
In this approach you will need professionally converted rear lamps. The companies that offer that kind of services disassemble US tail lights and modify the lamps by adding the indicators to the outer tail light. In this variant the indicators and stop lights are separated, but they are both in the body lamp, not on the trunk door.
You can see some examples on the left: the indicator is marked orange.
Of course this is just an example and there are many variants available on the market.
After installing the converted lamps you still need to re-program the BCM. Repeat the Common Steps, but do not swap the wires on the BCM. This is where the conversion will differ.
You will need to replace, cut, solder, and splice some wires, so prepare all the tools beforehand.
As seen on the diagram, pins 1-4 and 39-42 are bigger than the rest. For these, you will need Kostal SLK 2,8.
The small ones are Kostal MLK 1,22.
The fog light
- On the black C5/E connector switch pin 3 (left rear reverse) into pin 39 (rear fog light)
- On the white C6/F connector switch pin 42 (right rear reverse) into pin 5 (rear fog light)
This way the two rear reverse lights will become rear fog lights.
Swap the bulbs to red
Indicators
As you have deactivated the lamp diagnostics, you have a two spare circuits that you can re-use. You will need to change the terminals here.
- Undo pin 27 (small, left turn lamp diagnostics) on the white (C6/F) connector and plug it into pin 3 (big, left rear turn signal) on the black (C5/E) connector.
- Undo pin 31 (small, right turn lamp diagnostics) on the white (C6/F) connector and plug it into pin 42 (big, right turn signal) on the same white (C6/F) connector.
The effect should be as illustrated below. The result depends on the conversion of the body lamp of course (orange painting shows indicators, red shows stop lights).
LED & final remarks
LED
If you also replaced the bulbs with LED variants, go to Adaptations > LED lights settings and enable the corresponding LED features.
Final notes
The difference between the conversion methods is quite significant. Option 1 is cheaper, requiring only 3 bulbs changed.
It is also the less safe one. For example, if you park on the side of the road (to change the wheel for example) and open the trunk, the hazard lights won't be visible, as the indicators will point to the sky. The only lights indicating your presence on the road will be the marker/position lamps.
Some vehicle inspectors (MOT or similar) will not accept that type of a conversion, especially in the EU, where the legal requirement is to have a turn signal in a fixed element of the vehicle, unless there is a different indicator active when the trunk is open (like in Opel Insignia).
Option 2 is much safer and adheres to the EU law. However it requires more wiring work and and the lamps need to be cut, modified, and re-assembled. It is also more expensive, but you should ask yourself if it's worth to take risks, or if it's worth to pay more for safety.